Getting Started with XREAL SDK
Start developing your XREAL Unity apps on Android phone.
This quickstart guide will help you set up your development environment and test out the sample app “Hello MR” using XREAL SDK.
If you want to skip all these environment setup steps and get a ready-to-use project, you can refer to this repository. Simply clone it and you're good to go.
1. Prerequisites
Hardware Checklist
-
Beam Pro or a supported Android Phone. Currently, only the Samsung S24, and subsequent flagship series are supported.
-
A pair of XREAL glasses.
-
Android Debug Bridge (adb). Wireless ADB is not required but strongly recommended, so that repetitive plug in/out can be avoided.
Software Checklist
-
Unity LTS (Long Term Support) versions with Android Build Support:
-
Unity 2021.3.X LTS
-
Unity 2022.3.X LTS
-
Unity 6000.0.X LTS
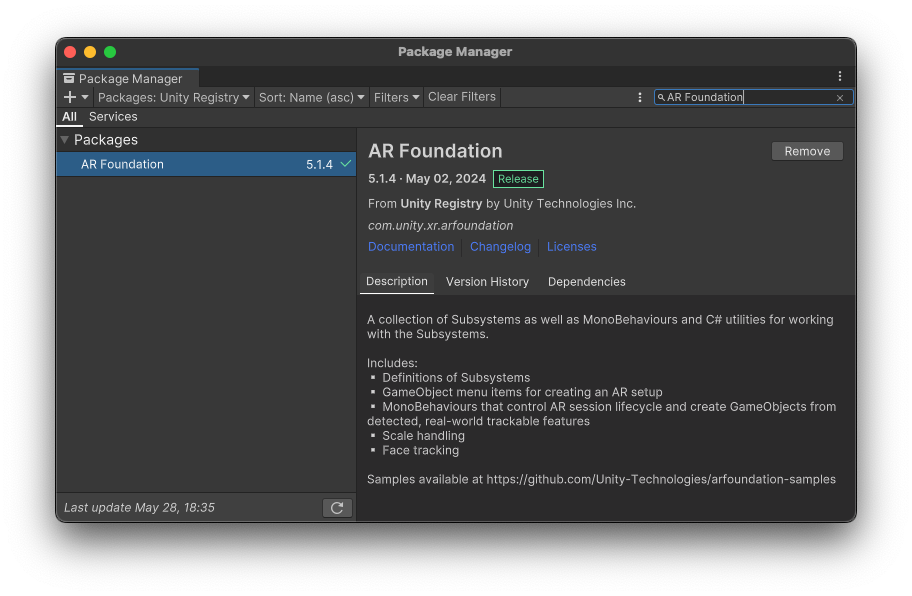
If you are using Unity 2021.3.X, please use AR Foundation 5.1.0 when you need AR Features.
-
-
XR Plugin Management
-
Latest XREAL SDK for Unity
- Sample
Interaction Basics - Sample
AR Features(Optional)
- Sample
-
XR Interaction Toolkit (Both 2.5.x and 3.0.x are supported)
- Sample
Starter Assets - Sample
Hands Interaction Demo(Optional)
- Sample
-
AR Foundation(Optional)
-
XR Hands(Optional)
-
Android SDK 12.0 (API Level 31) or later, installed using the SDK Manager in Android Studio
-
Visual Studio (if you prefer other development environments that’s fine too)
2. Creating a Unity Project
We’re going to create a new Unity project and integrate XREAL SDK later on. To create a new Unity project:
1. Open Unity Hub and create a new 3D project.
Switch to the Android platform. After switching, some version of Unity may require you to restart the project.
2. Import XRI and AR Foundation
-
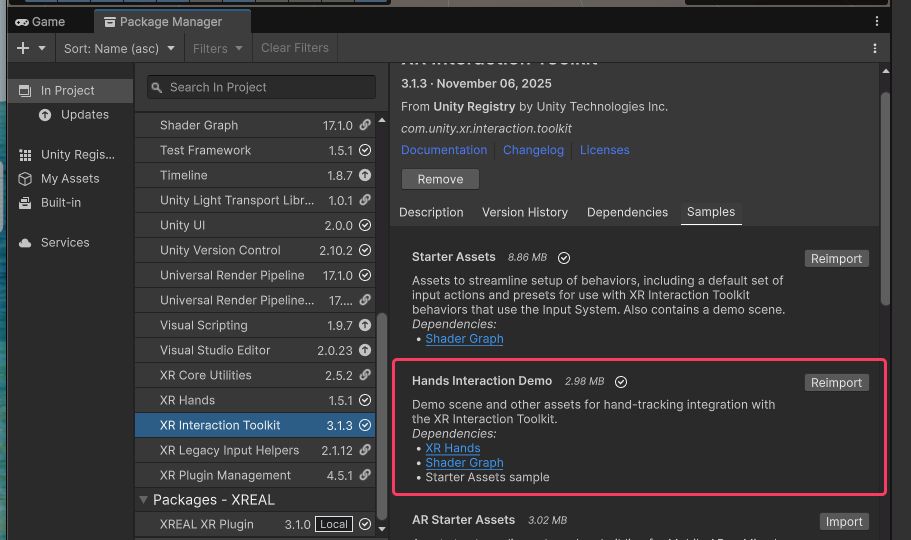
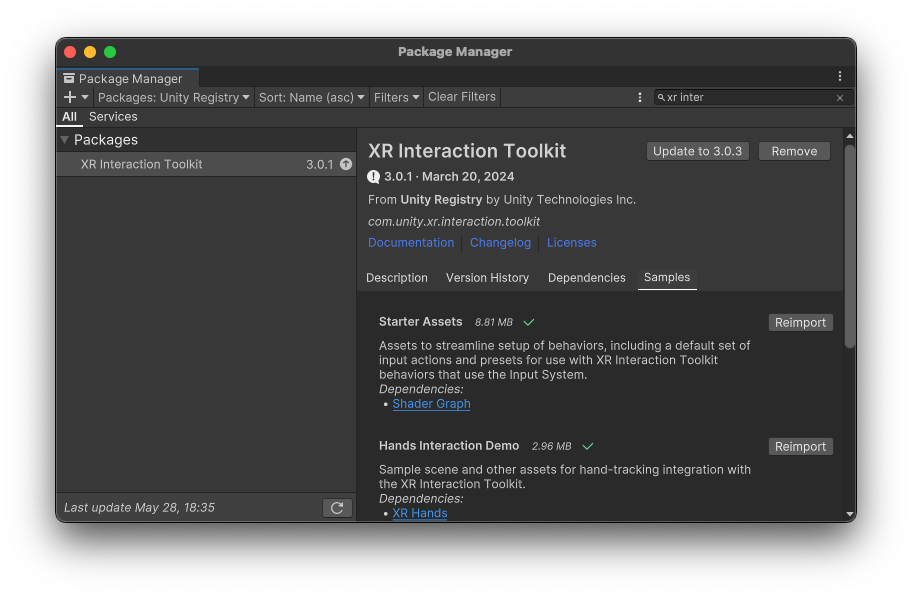
Install XR Interaction Toolkit from the Unity Registry in the Package Manager and import Starter Assets in Samples tab. If you only use controllers for interaction, the Starter Assets will suffice. However, if you want to use hand gestures for interaction, you’ll also need to import the Hands Interaction Demo.
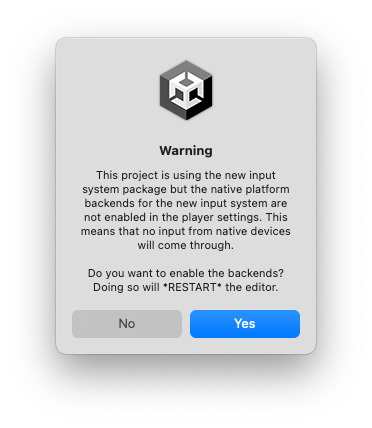
There will be a warning about new input system, and requires you to restart the editor, just click yes.
-
(Optional) Install AR Foundation from the Unity Registry in the Package Manager only if you need AR features like plane detection, image tracking, spatial anchors, or depth meshing. If you don’t require these features, there’s no need to install AR Foundation.
3. Import XREAL SDK for Unity
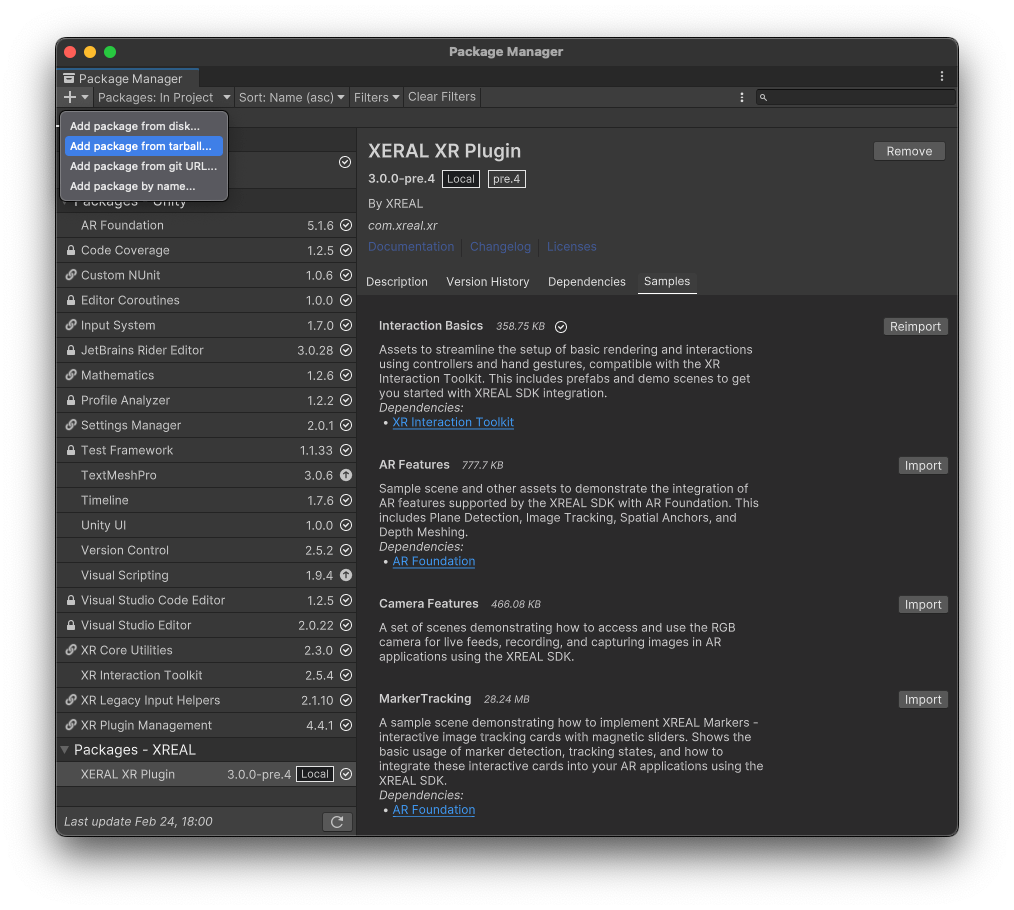
Open Window -> Package Manager -> Add package from tarball -> select com.xreal.xr.tar.gz and open.
After importing the SDK, you may encounter some errors, but don't worry; please continue reading.
You will find several key components that facilitate the development of AR applications within the XREAL SDK. Here’s a breakdown of the essential and optional elements:
-
Interaction Basics: This is an essential component that provides assets to streamline the setup of basic rendering and interactions using controllers and hand gestures, compatible with the XR Interaction Toolkit. It includes prefabs and demo scenes designed to help you get started quickly with the XREAL SDK integration. This component is fundamental as it lays the groundwork for any XR application, ensuring that you have the necessary tools for basic interaction and rendering.
-
AR Features: This is an optional component, recommended for those who require advanced AR functionalities in their projects. It includes sample scenes and other assets that demonstrate the integration of AR features supported by the XREAL SDK with AR Foundation. This part specifically supports Plane Detection, Image Tracking, Spatial Anchors, and Depth Meshing. Depending on the scope of your project, you can choose to import this component if your application will utilize complex AR features.
When setting up your project, start with the Interaction Basics to ensure all fundamental interaction mechanisms are in place. Then, depending on the AR features necessary for your project, consider importing the AR Features module to expand the application’s capabilities with advanced AR technology. This modular approach allows you to keep your project lightweight by only including the components necessary for your specific needs.
3. Configure Project Settings
You could either configure your project automatically via XR Plugin Management Project Validation or configure manually. These two ways are equivalent.
Project Validation (Recommended)
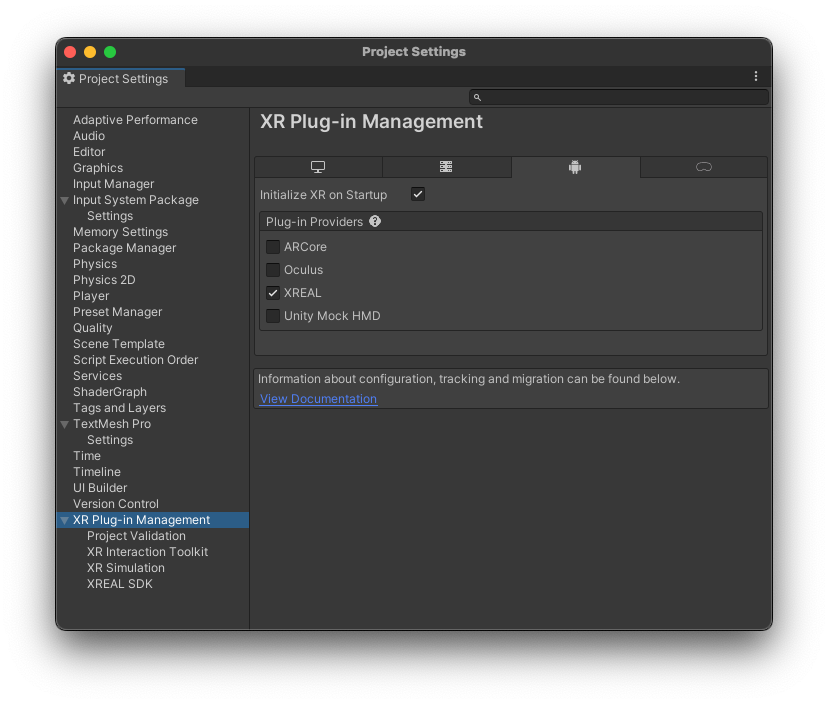
- To enable XREAL XR Plug-in, navigate to the project settings under Edit > Project Settings > XR Plug-in Management and open the Android tab. Check the XREAL plug-in.
- Initially, there might be some project settings that have to be updated/fixed. To do so, go to
Project Validationwindow. Click on theFix Allbuttons next to the entries to apply the needed project settings.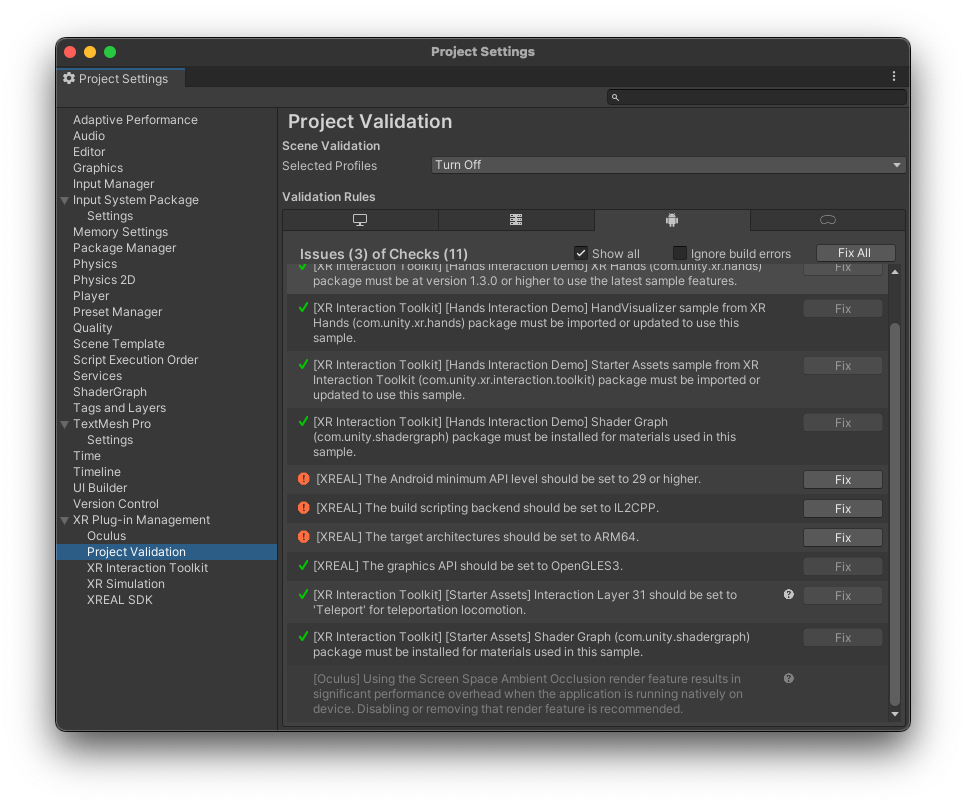
Manual Configuration
-
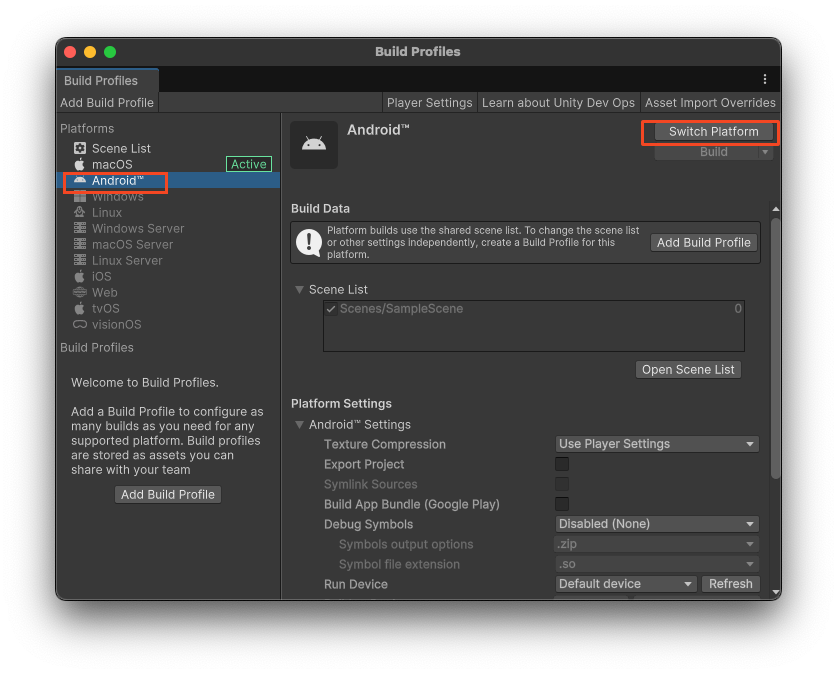
Go to File > Build Settings.
-
Select Android and click Switch Platform.
-
In the Build Settings window, click Player Settings.
-
In the Inspector window, configure player settings as follows:
| Setting | Value |
|---|---|
Player Settings > Resolution and Presentation > Default Orientation | Portrait |
Player Settings > Other Settings > Auto Graphics API | false |
Player Settings > Other Settings > Graphics APIs | OpenGL ES3 |
Player Settings > Other Settings > Package Name | Create a unique app ID using a Java package name format. For example, use com.xreal.helloMR |
Player Settings > Other Settings > Minimum API Level | Android 10.0 or higher |
Player Settings > Other Settings > Target API Level | Automatic (highest installed) |
Player Settings > Other Settings > Write Permission | External(SDCard) |
Project Settings > Quality > VSync Count | Don't Sync |
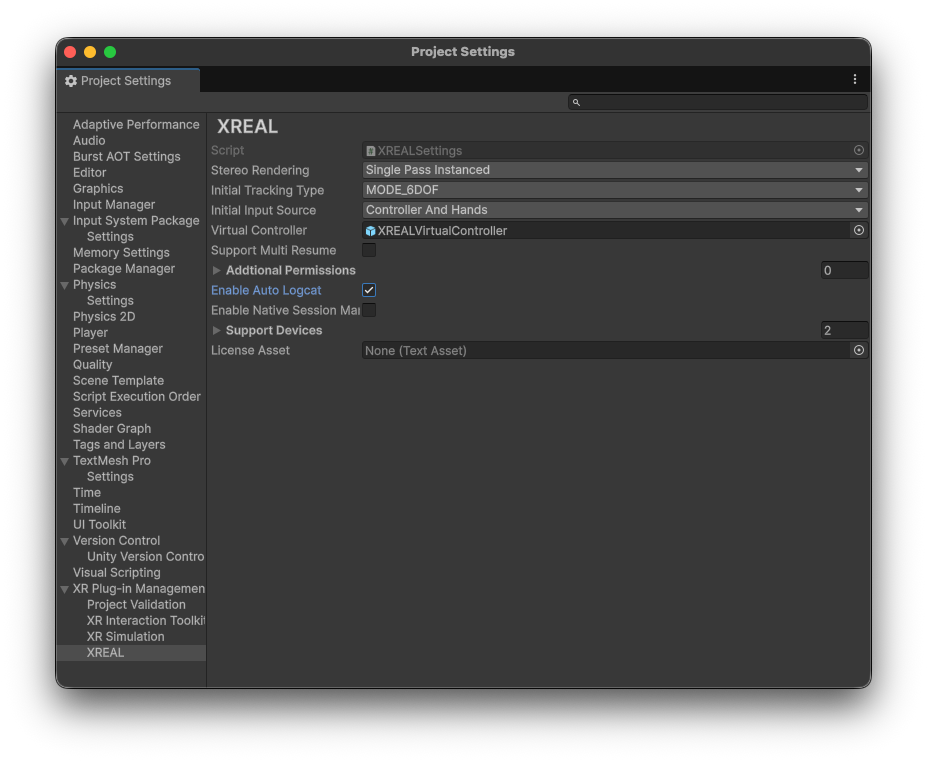
4.XREAL Specific Settings
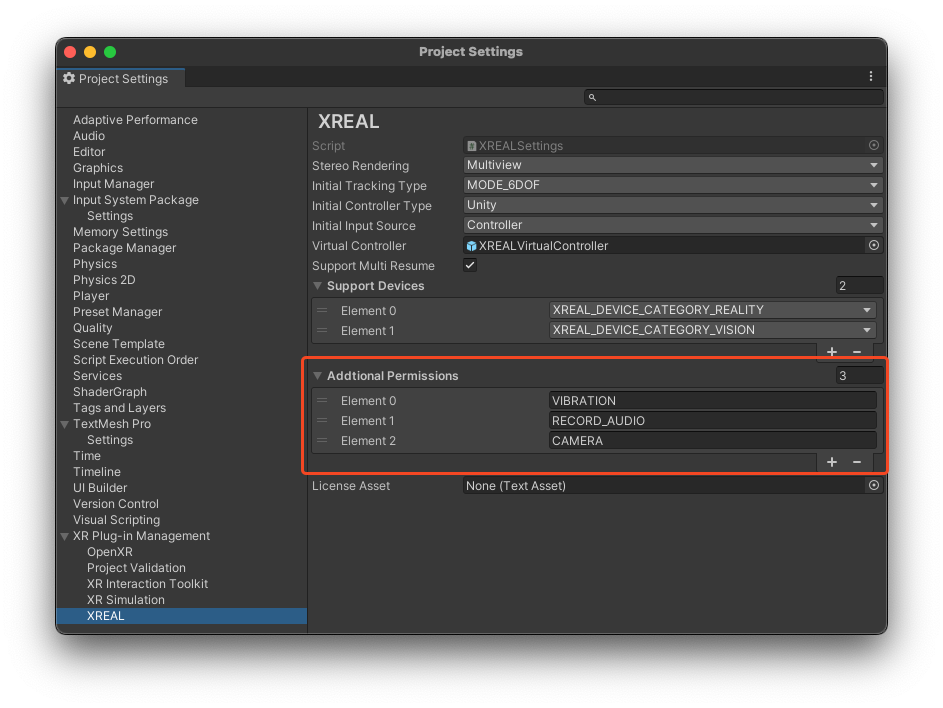
Access these settings via Edit > Project Settings > XR Plug-in Management > XREAL:
-
Stereo Rendering Mode- Multi-view: This mode renders the left and right eye views in a single pass, reducing the overhead and potentially increasing performance. To understand Single Pass Stereo rendering in detail, go to Single Pass Stereo Rendering topics in Unity’s documentation.
- Multi-pass: In this mode, the left and right eye views are rendered in separate passes, which can be less efficient but may be necessary for certain effects or compatibility.
-
Initial Tracking Type- MODE_6DOF (Six Degrees of Freedom): Allows tracking of both position and rotation in 3D space, providing a fully immersive experience.
- MODE_3DOF (Three Degrees of Freedom): Tracks only rotational movement, meaning the user can look around but not move within the space.
- MODE_0DOF: No tracking of movement or rotation.
- MODE_0DOF-STAB: No tracking but ensures a stable view, using some form of sensor data to reduce drift.
-
Initial Input Source- Hands: Uses hand tracking for input.
- Controller: Uses BeamPro or an Android phone as a controller for input.
- None: No input source is used.
- Controller And Hands: Uses both hand tracking and controller for input.
-
Virtual Controller: XREAL SDK allows the use of external devices, like BeamPro or Android phones, as virtual controllers. This setting defines the layout and functionality of the on-screen buttons for these controllers. -
Support Multi Resume: Enables dual-screen independent display mode, allowing the AR app to continue displaying in the glasses while the phone screen can switch to other 2D apps. When enabled:- The AR view remains active in the glasses even when the app is in background
- Users can freely use other apps on their phone screen
- Requires user permission on first launch
- Enabled by default in XREAL Settings

For more detailed information about dual-screen display, see Dual Screen Display.
-
Enable Auto Logcat: When enabled, the app will automatically save the current Logcat output each time it starts. The log file will be stored at:Android/data/<package_name>/cache/auto_log/logcat_yyyy-MMdd-HHmmss.log. This option is disabled by default. It is recommended to enable it during debugging to make it easier to capture logs and troubleshoot issues. -
Support Devices:- XREAL_DEVICE_CATEGORY_REALITY: Glasses with 6DoF tracking capabilities, such as the XREAL Air 2 Ultra.
- XREAL_DEVICE_CATEGORY_VISION: Glasses with 3DoF tracking capabilities, such as the XREAL Air 2 and XREAL One Series.
-
Android Permissions: Android permissions can be incorporated either by modifying the general Android Manifest.xml file or by utilizing the XREAL Settings interface for a more streamlined approach.- CAMERA: Allows the app to access the camera.
- VIBRATION: Allows the app to access the vibration. .
- AUDIO: Allows the app to access the audio.
-
License Assets: By configuring the License, you can unlock advanced features of the SDK.
5. Find HelloMR Sample Scene
-
After importing the sample Interaction Basics in Unity Package Manager, find the HelloMR sample scene in the Unity Project window by selecting
Assets/Samples/XREAL XR Plugin/3.0.0/Interaction Basics/HelloMR.unity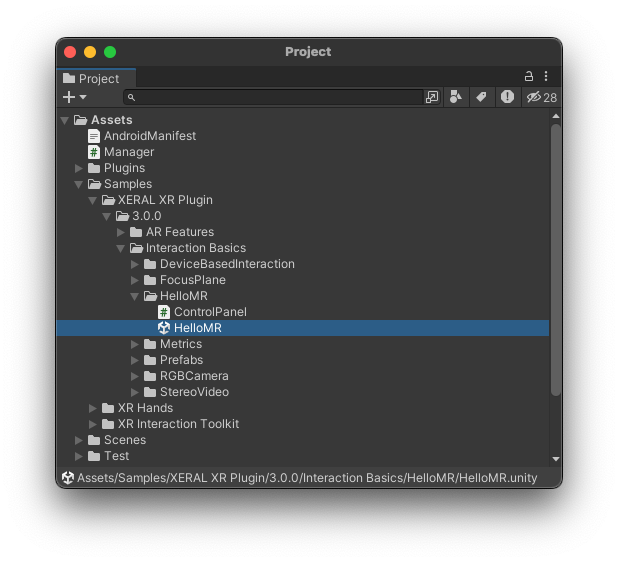
6. Building XREAL SDK App for Android
-
Access the Build Settings in Menu -> File -> Build Settings. Click the button "
Add Open Scene" and make sure the current scene is checked.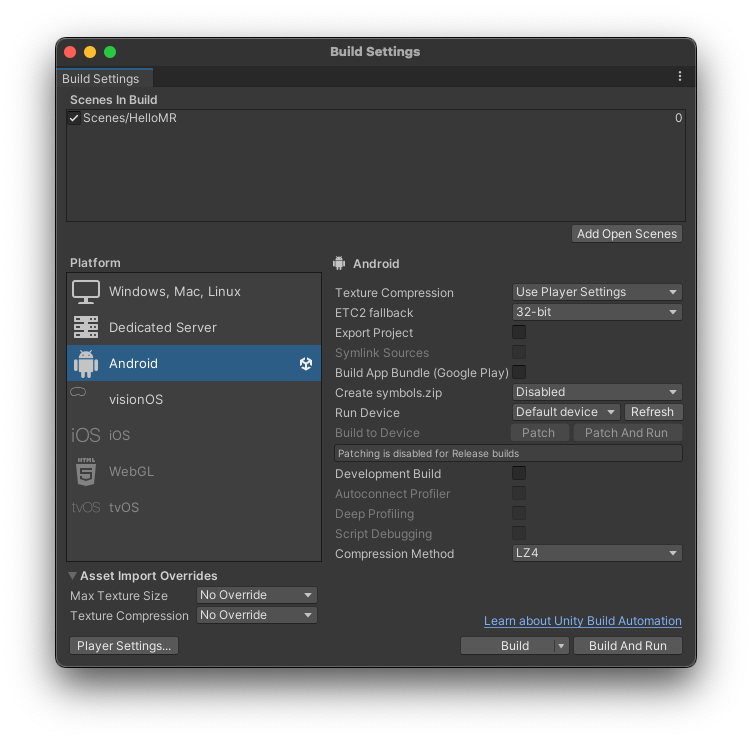
-
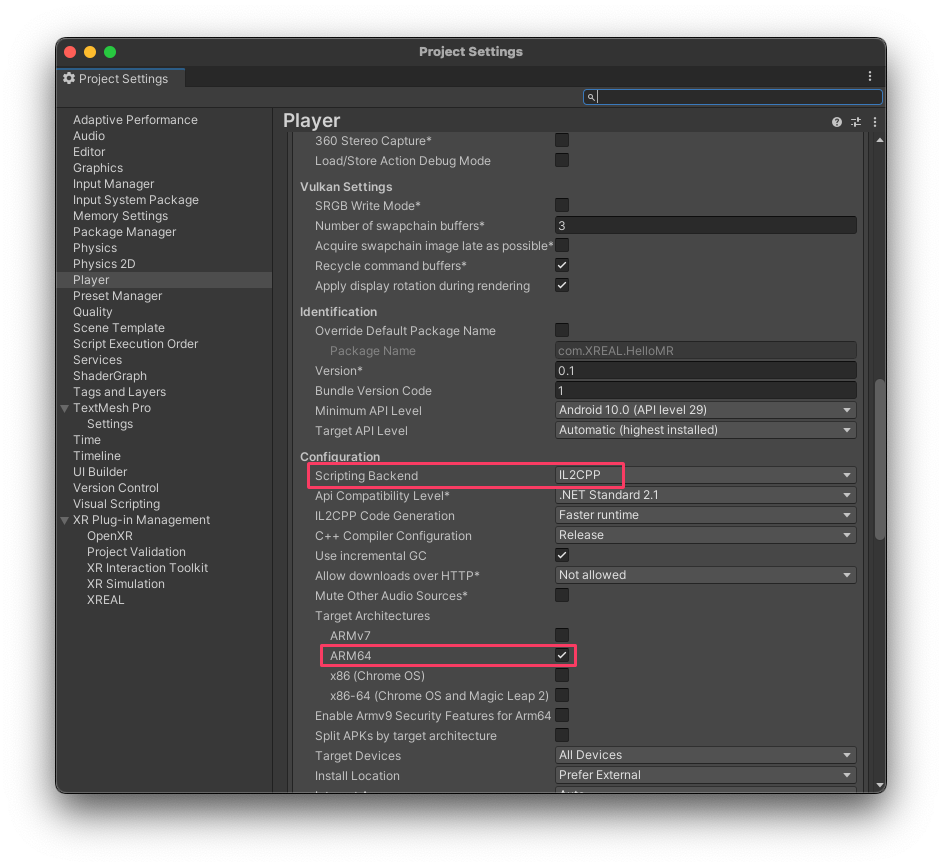
Click Player Settings. Customize the Company Name and Product Name.
-
(Optional) Navigate to the Android> Other Settings panel to specify your build settings. As you have prepared Step 3. Configure Project Settings, you may leave the current configuration as it is. It is worth noting some of the other settings:
-
Multithreaded Rendering: Enable this option to use multithreaded rendering. In most cases, both enabling and disabling this option is supported by XREAL SDK. However, for the scenes that contains Overlay content, you should disable multithreaded rendering. And When developing URP projects, if single pass rendering is not used, it is best to also turn off Multithreaded rendering, otherwise tearing may occur.
-
Scripting Backend: You must choose IL2CPP when building for ARM64 architecture. Note that starting from NRSDK 2.2.0, ARMv7 architecture is no longer supported.
- In Build Settings window, click Build.
- Select the destination folder and wait until the building is finished.
7. Deploy to XREAL Device
- Connect your Phone / Beam Pro to your Mac / Windows PC.
- Install your app through WiFi Android Debug Bridge (adb) or type-C cable after the build is successful.
- Disconnect the device with your PC, and then connect it to the glasses.
- Open ControlGlasses(Android phone) or MyGlasses(Beam Pro), then find your app then click to open it.
- Grant the necessary permissions if prompted, especially ensure that "Allow to display over other apps" is checked.
- (Optional) Use Android Logcat to view logged messages. We recommend using WiFi Android Debug Bridge (adb) to connect to your PC so that you do not have to be connected through the data cable most of the time.
- Enable developer options and USB debugging on your Phone / Beam Pro. Android Debug Bridge (adb) is enabled as default and does not require manual setting.
8. Troubleshooting
1. How to obtain key events, gesture events, etc.
Controller events, gesture events, controller position information, gesture position information, and HMD position information can all be obtained through Unity's Input System. For detailed information, please refer to the official Unity manual at https://docs.unity3d.com/Packages/com.unity.inputsystem@1.7/manual/index.html
2. XREAL Logo Not Visible in URP Project
The default material is not a URP material; you need to manually change the material.
3. Adding Android Permissions
Android permissions can be incorporated either by modifying the general Android Manifest.xml file or by utilizing the XREAL Settings interface for a more streamlined approach.
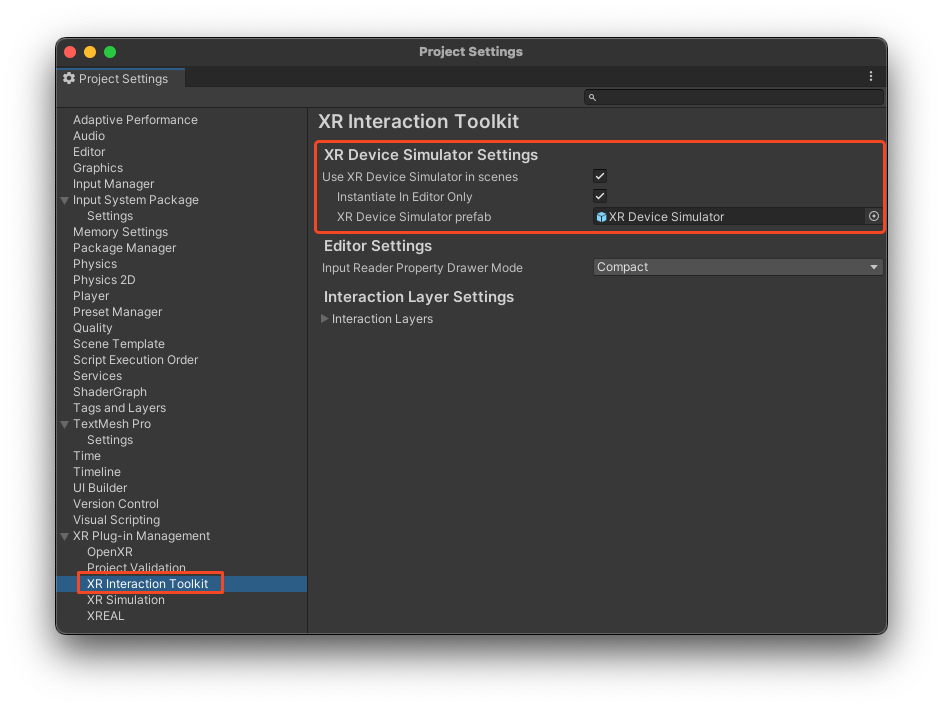
4. How to activate Device Simulator
Firstly, import the XR Device Simulator from the XR Interaction Toolkit samples.

After importing, ensure that the simulator is enabled.
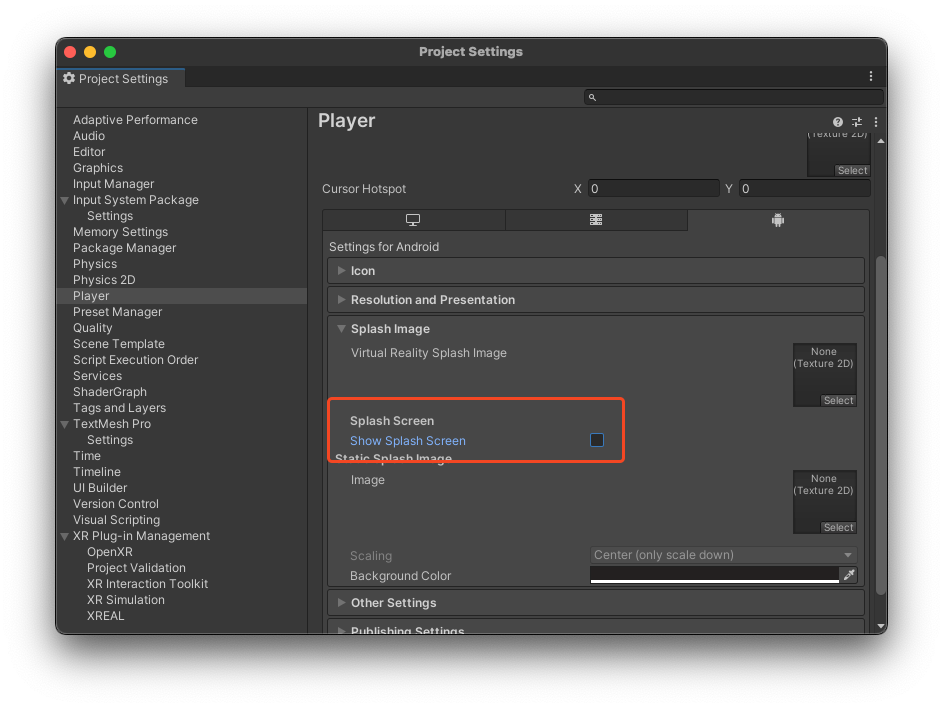
5. How to disable the Unity logo splash screen in your app.
To disable the splash screen, you must have a Unity Pro license. Once you have the license, navigate to Edit -> Project Settings -> Player, and under the Splash Image section, uncheck the option for displaying the Unity logo. This will remove the splash screen when your app starts.
6. Composition Layers with Layer Order Less Than 0 Not Visible in URP
In URP, HDR must be disabled. The reason for this is that when HDR is enabled, Unity uses R11G11B10 textures instead of R8G8B8A8_UNorm. Consequently, the Alpha Blend of the Composition Layer does not function correctly, although the Layer Order feature remains operational.
7. Missing prefab in HelloMR
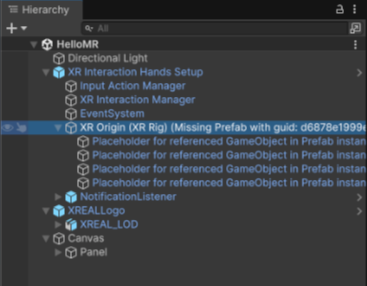
To resolve this issue, you need to import Hands Interaction Demo.